Our opinion on the Lansky “turnbox” Deluxe sharpening kit
7.3
BUYITFORLIFE SCORE
Best quick and easy sharpening set.
It’s a little revolution in my kitchen. You don’t have to be a Canadian trapper to appreciate this ingenious tool. Light, simple, efficient, you could almost say minimalist. I adopted it in the blink of an eye.
Verdict on the Lansky ceramic sharpening set
I spent a long time looking for a system that was durable, satisfying and simple. I’ve found it. With this system, you can take out your equipment, sharpen two or three knives and put everything away in less than 10 minutes. As a result, you sharpen your knives more regularly, and you’re never left with a dull-edged knife for long. In short, good habits!
7.3BIFL Score
Very good. buyitforlife 10 years and up
Always at hand.
Buy at the best price
Why we love it:
Accessible to all
We’ve all hesitated before taking the plunge. I can assure you that it’s very simple.
Satisfactory
The feeling after a quick sharpening is immediate: it cuts!
Why it’s different:
Portable
This original design means that this little wooden box can follow us on all our adventures, including weekends away with the family :-).
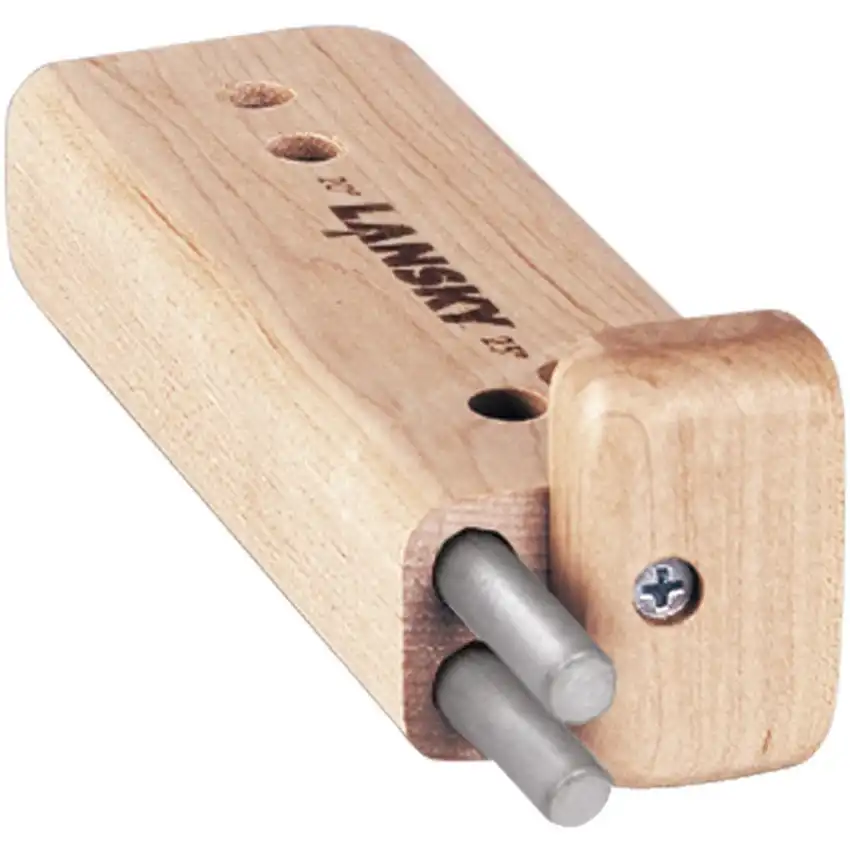
Design Lansky
40 years of experience.
How many companies do you know whose core business is sharpening?
How many companies do you know whose core business is sharpening?
Technical data
Materials
Base: wood
Bars: ceramic (two grains)
Weight: 255g
Bars: ceramic (two grains)
Weight: 255g
Dimensions
Length: 15.3 cm
Width: 5 cm
Height: 3 cm
Bar length: 12.7 cm
Width: 5 cm
Height: 3 cm
Bar length: 12.7 cm
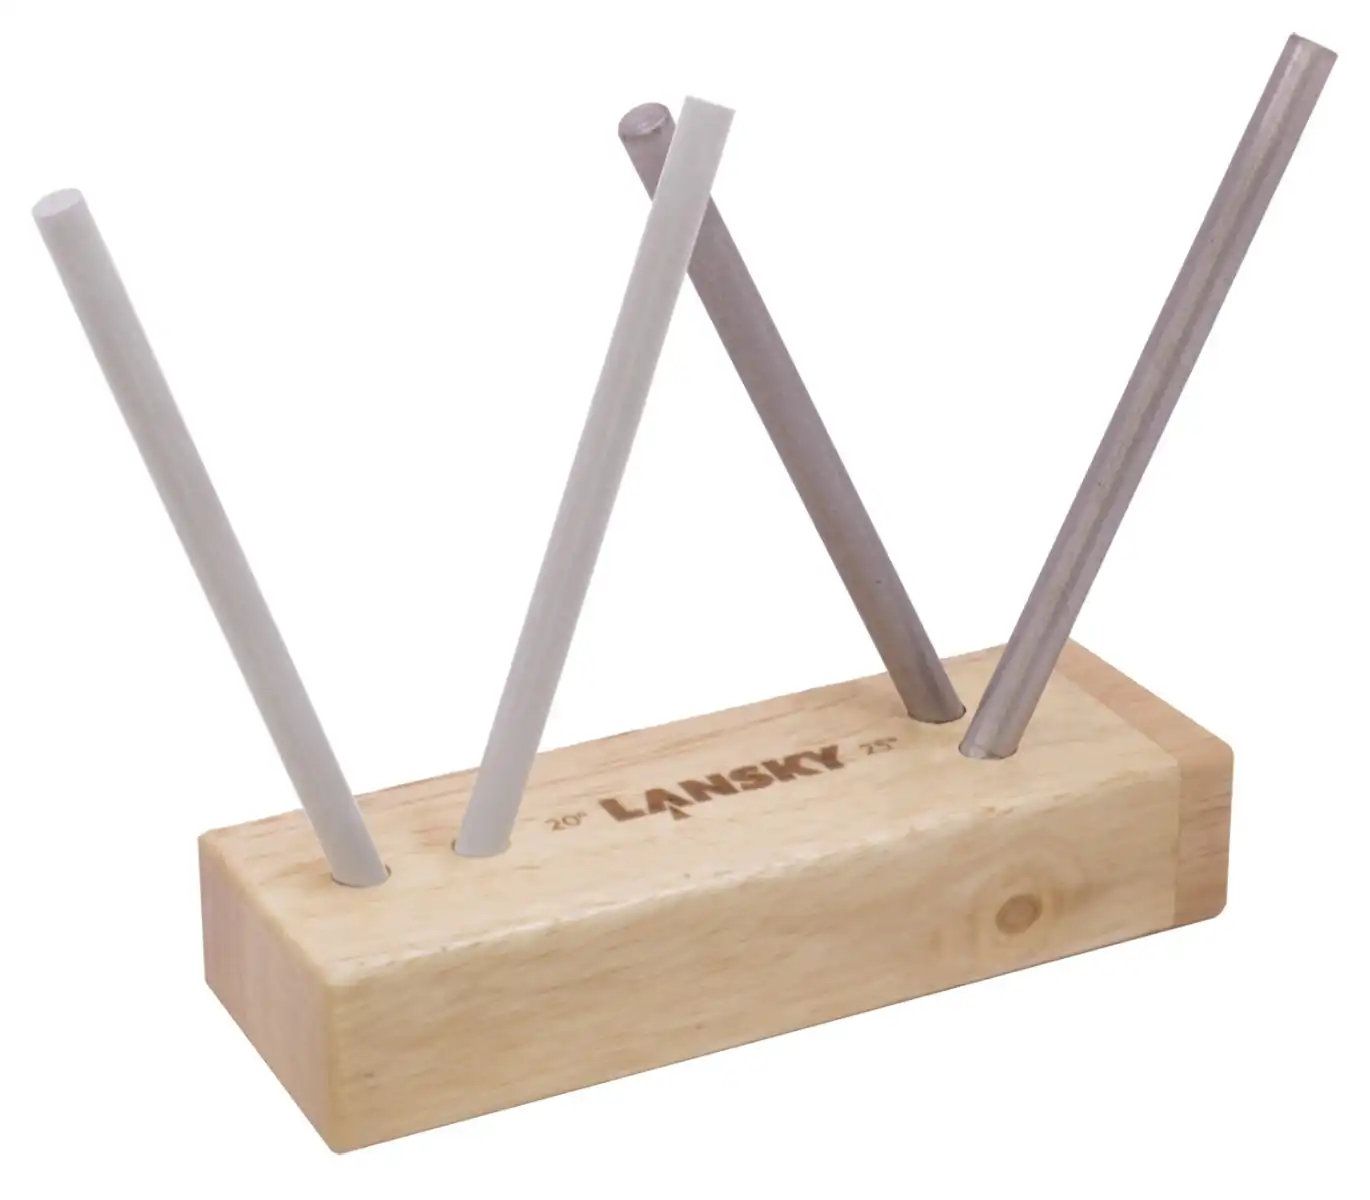
Sharpening angles and grits
Preset angles: 20 degrees and 25 degrees
Grains: Medium (800), Fine (1000)
Grains: Medium (800), Fine (1000)

Main uses:
Possible limits:
More information on the Lansky brand:
Instructions for use of the Lansky sharpening set:
| Instructions | USING YOUR TURNBOX |
| Steps | Sharpening in 1 or 2 steps. – Silver/brown diamond rods are used for sharpening. – White ceramic rods for polishing. |
| Installation | Set up on a stable, flat surface at a comfortable working height. |
| 1-step sharpening: | |
| Step 1 | Choose the type of rod and the desired angle (20° or 25°) by placing the rods in the appropriate guide holes. |
| Step 2 | Hold the base firmly with your non-dominant hand, keeping your fingers away from the rods while maintaining a firm, controllable grip on the base. |
| Step 3 | With the knife in your dominant hand, place the heel of the blade (closest to the handle) under the top of one of the stems. |
| Step 4 | Hold the blade vertically (perpendicular to the work surface) and slide it down and towards you, moving towards the tip of the knife. The movement is similar to slicing bread. This is where it all comes into play: avoid rolling the tip of the knife off the stem. This can damage the tip and make it blunter than the rest of the blade. Be patient and perform the gesture slowly to obtain an even cutting edge. |
| Step 5 | Repeat this action on the other rod for the other side of the cutting edge. |
| Step 6 | Continue alternating between rods until you reach the desired level of sharpness. (about ten strokes per side are sufficient). |
| 2-step sharpening | |
| Step 1 | Start by placing the pins in the holes at a 20º angle and follow the 1-step sharpening instructions, but do not polish. |
| Step 2 | Move the rods to the holes at an angle of 25º for the second step and finish the bevel using the same technique. The result is a sharp, long-lasting bevel. |
Leave a Reply